love it |
want it |
 |
 |
 |
 |
have it |
tag it |
|
Microsoft Xbox
How to Go from Xbox to Xbox Media Center in 30 minutes
So you've heard rumors of, or perhaps seen friends with, a pimped out Xbox running Xbox Media Center.
They are streaming their favorite TV shows, movies, mp3s, and pictures
all to their kickass home theater, and now you want some of that
action. This guide is written to help you get from a standard Microsoft
Xbox to a Xbox Media Center in a relatively short time with the least
amount of headaches. I've
compiled a step-by-step guide with a complete parts/software list for
everything you'll need to get, to know, and to do, so that you can
consider yourself amongst the XBMC elite. I have a set up a discussion here for those of you with any questions about this guide or to answer any problems you may encounter. Items You'll Need - Microsoft Xbox ($150)
- Networked PC Computer ($???)
- Original Mech Assault game ($20)
- Datel Xbox Action Replay ($25)
- Ltools Linux loader ($0)
- Xbox Media Center (XBMC) ($0)
- mIRC ($0)
- FlashFXP ($0)
- Winrar ($0)
This list is also available on my user page hereWARNING:
Attempting to modify your Xbox is done at your own risk as it is
possible to damage your console through the steps outlined in this
guide. 1. Get an Xbox!Either
you can go out and buy a new Xbox, a used Xbox, or use your existing
Xbox. Once you are done with the XBMC modifications, it'll be worth its
weight in gold. Now, you should make sure you are fairly familiar with
the Xbox and the controller. This guide will refer to the Xbox
"Dashboard", which refers to the software that loads (hint: it's green)
when you turn on your Xbox without a game in it. 1.1 Determine your kernel versionBefore you get started you must first determine the particular kernel version
of your Xbox. This is a 4-digit number starting with 5 that can be
determined from the Xbox Dashboard. Look for something that looks like
K:1.00.XXXX.01, where XXXX is your kernel version. To
determine your kernel version, first turn on your Xbox without a game
in the tray, then, using the "A" button, select "''Settings followed by System Info
from within the Xbox Dashboard. Now, you must wait for the system info
that is displayed to scroll down until you see something that looks
like the picture I've provided. Write this number down, as it will be used in step 4.3.''' 2. Buy the necessary equipmentThere are two purchases that you need to make to get your Xbox running XBMC. You need to buy a game called Mech Assault (also can be done with 007: Agent Under Fire, but that's outside of the scope of the guide), and you need to get an Xbox Action Replay. 2.1 : Buy Mech Assault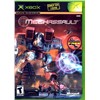 Mech Assault You
must find an original copy of Mech Assault that can be used to modify
your original Xbox. This game may be hard to find, so your best bet may
be from a friend or from a used store. You have to make sure that the
version of the game is correct before you make your purchase otherwise
you might waste $20 or so. The reason is because Microsoft has "fixed"
Mech Assault in subsequent versions so that the exploit cannot be run.
Please read this forum for more info. The newer copies of Mech Assault say either "Game of the Year" or will be designated as "Platinum Hits" and these will not work. You need a copy of Mech Assault that is listed as either Part No. X08-82262 or X08-82264.
Take a look at the pictures below to find out where to read the part
number on the box and disc. You should note that sometimes when buying
used games the disc will be matched with a different case, so you
should make sure the part number on the disc is the proper one. You
will need to hang on to your copy of Mech Assault if you ever want to
undo the modifications you've made to your Xbox, but otherwise this
game can sit on yourself as it is will not be needed after you've
performed the exploit. 2.2 : Buy an Xbox Action Replay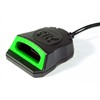 Action Replay! The
Xbox Action Replay is a device that allows you to load game saves from
your PC to your Xbox using your PC's USB interface and an included 8 MB
memory card. It is available for approx. $25 at most stores that sell
games. Once you've successfully performed the
exploit, technically, you do not have any reason to keep this device as
it will not be needed. However, you may want to keep it on hand in case
you want to perform another exploit on another Xbox (or use it for its
intended purpose). 3. Download the required sharewareBefore
we get started with the mod, you will need to get 3 pieces of shareware
software that will become necessary later: mIRC, FlashFXP, and WinRAR.
If you have any of these already, then you can use your existing copy. 3.1 : Download/Install mIRC mIRC mIRC
has a downloadable shareware copy that can be used for 30 days until it
requires registration. Once downloaded install this software as you
normally would. 3.2 : Download/Install FlashFXP FlashFXP FlashFXP is a great FTP transfer tool that you will use to move files back and forth between your PC and Xbox. 3.3 : Download/Install WinRAR WinRAR WinRAR
is an archive manager that you will need to uncompress .RAR files. This
is much like a .ZIP file that you may already be familiar with. 4. Download the Xbox softwareThere
are two key pieces of software that need to be loaded onto your Xbox
for your mod to be considered complete. These can be downloaded from an
FTP site, however, you need to first get access to the FTP site using
IRC. 4.1 : Get your FTP password from IRCThere is a great, detailed guide here how to perform this step. To sum up quickly what you need to do: - Open up the mIRC software and connect to an EFNET server.
- Connect to a channel called #xbins
- type "/msg xbins !list" at the command prompt in mIRC
- instructions how to access the FTP site (complete with username and password) will popup
Write this information down, as it will be required by the next step. 4.2 : Connect to the Xbox FTP distribution siteStart
FlashFXP and create a new connection using the information that was
provided to you from the IRC session. There should be an FTP site, a
username, and password filled out. You have a limited session allowed
on the site, so the first time you log in, you should get both of the
files necessary in one shot. Otherwise, you will need to repeat step
4.1 to regenerate a new username and password. 4.3 : Download ltoolsNavigate to /XBOX/Operating Systems/linux/distributions/ltools/
from within FlashFXP and you should see a list of files. Based on your
kernel version from step 1.1 you should download the appropriate file: - Kernel version less than 5530 �€“ download the file called ltools_MA_v1.7.5.zip
- Kernel version greater or equal to 5530 �€“ download the file called ltools_MA_v1.8.rc1.zip
Save
the file in a location that you will find easy to access later, since
this file will be used in conjunction with the Action Replay to exploit
Mech Assault. 4.4 : Download Xbox Media Center (XBMC) Xbox Media Center Navigate to /XBOX/apps/media players/XboxMediaCenter (XBMC)/
so that you can download Xbox Media Center. It is a RAR file that is
approximately 40 MB in size. Download this file to a safe place on your
computer. Within this RAR is the media center program that will run on
your Xbox, effectively turning your Xbox into the ultimate media
streamer/player. Visit http://www.xboxmediacenter.com/
to read about this application. You should note that you can download
versions of XBMC through your favorite torrent client as well. 5. Install the ltools exploit on your XboxNow
that we've collected all of the necessary hardware, software, and game
necessary to perform the XBMC modification, we can get started with the
actual mod. The first step of the mod is to load the ltools file onto
your Xbox using Action Replay. Actually, this "file" is a gamesave that
runs within your copy of Mech Assault. 5.1 Install and run Action Replay on your PCAction
Replay should come with an install CD that you need to install first
before you get started. Follow the instructions provided by the install
software, and once finished, insert the Action Replay device complete
with the memory card into your PC's USB port, then start the Action
Replay software. 5.2 Copy ltools to the Action Replay memory CardYou
should see three columns in the Action Replay window. Drag-and-drop the
ltools ZIP file downloaded in step 4.3 into the center column labeled
"PC database". Now scroll down the list until you see "Mech Assault"
and a child item labeled "Run Linux". "Run
Linux" is the title of the game save that you will load up within Mech
Assault. Drag and drop this file from the "PC Database" column to the
"Memory Card" column on the left. This process can take several minutes
as the memory card is written. A dialog should tell you when it is
complete, then proceed to step 5.3. 5.3 Copy ltools from the memory card to the XboxYou
now must move the "Run Linux" game save from the memory card to your
Xbox hard drive. Technically, you can run the game save from the memory
card itself, but I prefer to load it onto the hard drive for safe
keeping. If you prefer to do this as well, you can skip to step 6. Insert
the memory card into your Xbox controller, power on your Xbox (without
a game), and you should see the familiar Xbox dashboard welcome screen.
Select the section labeled "memory" and follow the following three
screen captures to get the gamesave from the card to the Xbox. 6. Perform the exploitUp until now, you have not done anything to your Xbox other than load the gamesave. Step 6 crucial as this is where the actual exploit will take place. 6.1 Run LinuxPut
your copy of Mech Assault into your Xbox and it should load up. From
the main menu in Mech Assault select the option labeled "campaign".
Now, you should see the familiar gamesave title "Run Linux". Load this
gamesave by highlight it and pressing "A". 6.2 Start the ExploitAfter
you selected "Run Linux" some Matrixesque graphics should've appeared
and you ended up at what looks to be a new program. This program is the
MXM dashboard written as an alternative dashboard to the Xbox
dashboard. The exploit is bundled with this dashboard and can be
accessed from the menu option labeled either "UXE install" or "UDE
install" depending on which ZIP file you downloaded according to your
kernel version from step 1.1. Note: you may have to press "B" on the controller to get to the main menu in MXM where this option will appearPress
"A" on "UXE install" (or UDE) and you will be prompted with several
questions by the installer to configure your particular setup. Those of
you with kernel version lower than 5530 should select UDE as opposed to
UDE2 as the answer to the first question. (Questions are answered by
pressing either "A" or "B" on the controller). The answers to the other
questions should be "PBL/Metoo" as the choice for BIOS loader and
"EvoX" as the choice for the default dashboard. These choices are a
matter of taste, but for simplicities sake, choose these two options. Once
you've answered all of the configuration questions the exploit will
begin. It has been my experience that you may or may not see the
command window displaying what is happening. Either way, do not panic.
The circular light on the front of the Xbox will glow orange
while the exploit is being performed. This should take a few minutes
when you will see the light start flashing "green". This signals the
completion of the exploit, and you can turn your Xbox off and then on
using the little button to power up your modified Xbox. DO NOT TURN OFF YOUR XBOX BEFORE THE LIGHT TURNS FROM ORANGE TO GREEN. 6.3 OPTIONAL: Uninstallation and troubleshootingAfter
step 6.2 is complete your Xbox is setup so that you can get to the MXM
dashboard either by turning on the Xbox with the eject button or by
launching "Run Linux" as you did in step 6.1. You can uninstall the
exploit by selecting "UXE uninstall" from within the MXM dashboard.
'''note: MXM has FTP functionality which may come in handy if something
goes wrong". For now, we can move on to step 7. 7. Install XBMC on your XboxPowering on your Xbox without a game loaded
should now bring you to EvoX dashboard. Many people are happy to leave
EvoX as their default dashboard on their modified Xbox but I prefer to
install Xbox Media Center because it has all the capabilities of EvoX
plus the aforementioned amazing media streaming capabilities. This is possible because you now have access to your Xbox's hard drive through FTP access over your network. Cool, eh? 7.1 Connect the Xbox to your networkIf
you haven't already, you need to connect your Xbox to your network (or
at least your PC) so that you can get FTP access. If you have a typical
home network with a router, then your Xbox would have been assigned an
IP address automatically using DHCP. If you don't have a network, then
you will need to connect your Xbox to your PC using a crossover cable
and manually assigning the IP addresses. (Read this if that is your case) Determine
your Xbox's IP Address by looking at the upper right corner of EvoX
where it should be listed. (Alternatively, your network setting can be
viewed from the settings section within EvoX). You can check to see if
your Xbox is available on your network by "pinging" this IP address
from the command prompt on your PC. 7.2 Copy XBMC to the Xbox using FlashFXPGo to the location on your PC where you download your copy of the XBMC .RAR file. Using WinRAR, extract the files to your PC. Start
FlashFXP and navigate locally to the location where you extracted XBMC
on your PC. Now, open a new FTP connection to your Xbox. Enter in the
IP address from step 7.1 and username: xbox with password: xbox. You should now be able to get access to the Xbox's directory structure. Navigate
to /E/Dashboard/ on your Xbox. This is where EvoX is installed, so to
have XBMC replace EvoX, you simply have to copy the XBMC files to this
location, overwriting the existing files. If you like you can make a
copy of the /E/Dashboard/ directory on your XBox as /E/Dashboard_BAK/
or something similar. Now select all of the files from XBMC that are
located on your PC and transfer them to the /E/Dashboard/ directory on
your Xbox. This will take several minutes, so please be patient. Once this is complete and you power cycle your Xbox, Xbox Media Center should start up. You
can configure Xbox Media Center from within the dashboard itself or the
setting can be modified directly in the XboxMediaCenter.xml file
located in the root of the application directory on the Xbox. 8. Configure your network sharesTo
start streaming your media from your PC or home network it is as simple
as creating network shares of your media folders on your PC. You should
be able to navigate to the computers on your network using the SMB
network options from within XBMC. Also, you can create shortcuts to you
media folders in XBMC so you don't have to navigate through so many
folders to get at all of your media. ConclusionsCongratulations, you now have a pimped out Xbox running Xbox Media Center! There
are many capabilities that have not been mentioned in this guide, and I
leave you to discover the splendor that is the modified Xbox with Xbox
Media Center.
|